Morph Volume Panel

Use the Morph Volume panel to create, edit, save, load, convert, and delete morph volumes.

Location: Tools page > HyperMorph module

A morph volume (or "mvol") is a six-sided prism that can be used to manipulate a mesh by manipulating the shape of the morph volume. Morph volumes are very malleable; the length and curvature of each edge can be modified independently of the others, and adjacent morph volumes can be linked through various tangency conditions. This malleability allows you to enclose a given mesh with morph volumes, alter the morph volumes to fit your model, and then change the shape of your model by modifying the morph volumes. Morph volumes present a simple, powerful, and intuitive way to morph.
Although morph volumes can be created, edited, and deleted in this panel, the actual morphing of morph volumes is performed either in the Morph panel, where you can move the handles, or the map to geom panel, where you can map morph volume edges to a variety of entities. Morph volumes behave very much like domains (by moving the handles associated with the morph volumes the enclosed mesh can be manipulated) but morph volumes have the additional feature that you can morph them independently of the enclosed mesh. For instance, if you wish to change the shape of your morph volumes without affecting the mesh you can set the morph volumes to be inactive. This allows you to use all of the morphing capabilities to modify the shape and position of your morph volumes to better fit your mesh. Then you can switch the morph volumes back to being active and use them to morph the mesh.
Note: When you set your morph volumes back to being active, you may be asked whether you want to remove the inactive handle perturbations from the morph list. Clicking yes, which is recommended, will make it so that the undo and redo buttons do not undo and redo the inactive movements of your morph volumes. Clicking no will treat the morph volume perturbations just like any other morphing. The toggle that allows you to switch morph volumes between being active and inactive can be found in the parameters subpanel of the Morph Volumes panel, and in the morphing subpanel of the Morph Options panel.
Morph volumes will only morph the mesh for nodes that have been registered. In some cases, nodes within morph volumes are automatically registered when the morph volumes are created, while in others only the selected nodes or nodes on selected elements are registered. If the morph volumes do not appear to be morphing nodes inside them, you may need to register those nodes.


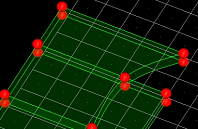
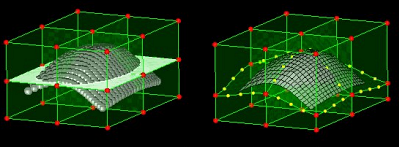
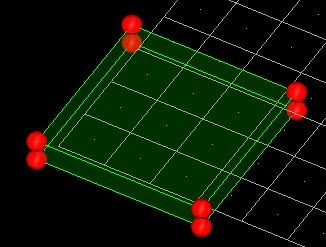
Figure 1. Morph Volume with Handles at the Corners

Create Subpanel

Use the Create subpanel to create a single volume, or a matrix of volumes, enclosing nodes or elements.
Option Action
creation method
create morphvol (default)
Select the elements or nodes you wish the new volume to contain.
pick and enclose
Select nodes to indicate where you wish your new volume’s corner handles to be.
This method works in two different ways.
  • Select a node for each of the eight corners of the new morph volume.
  • If your model contains at least one morph volume, you can create a new volume adjacent to an existing one by selecting nodes on the face of the existing volume (and optionally designating the elements or nodes that you wish the new volume to contain). HyperWorks X creates a new volume, joined to the first, which either contains those nodes/elements, or which extends outward a distance equal to the average length of the edges on the selected face.


Figure 2. . Notice the gray, highlighted elements.


Figure 3. . The new mvol conforms to the shape of the selection.
pick on screen
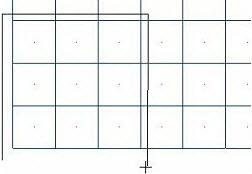
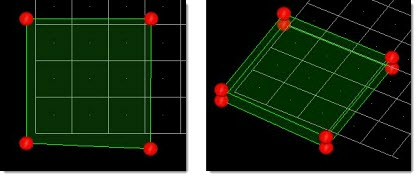
Draw the 2D boundaries of the new morph volume directly on-screen. The new morph volume will be given sufficient depth to enclose all the nodes selected within the window.


Figure 4.
In Figure 5, 3 of 4 lines have been laid down. When the 4th is laid, HyperWorks X creates a new morph volume matching its shape and thick enough to enclose the relevant elements.


Figure 5.
reflect morphvols
Select one or more reflective symmetries, and create new morph volumes by reflecting existing ones.


Figure 6.
create matrix
Create a uniform matrix of connected morph volumes. As morph volumes are 3D, you can create a single-layer matrix of morph volumes (for example, nine volumes in a 3x3x1 matrix) or a multi-layer matrix (such as a 3x3x3 cube). Additionally, if you select a cylindrical coordinate system for the matrix, the matrix will be oriented around the central axis of the system.


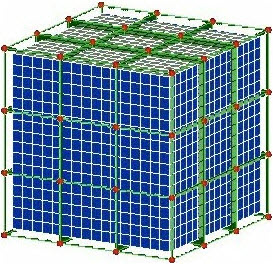
Figure 7. Rectangular Matrix, with X,Y,Z Density of 3,3,3


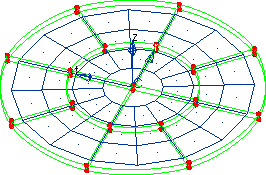
Figure 8. Cylindrical Matrix with R, Theta, Z Density of 2,8,1
drag morphvols
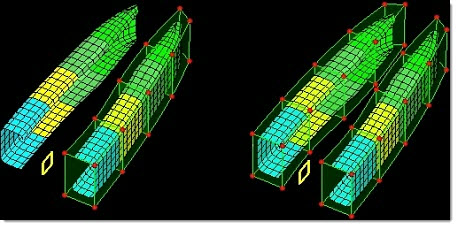
Select existing morph volumes and drag their faces through a mesh, along a line or nodelist, along a vector, or about an axis.


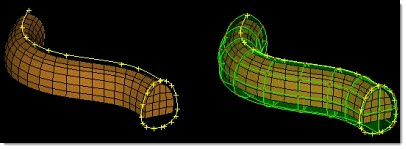
Figure 9. Volumes Dragged along a Node List


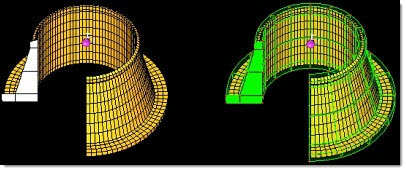
Figure 10. Volumes Spun about an Axis
drag elements
Select shell elements and drag them through a mesh, along a line or nodelist, along a vector, or about an axis.
drag matrix (rect)
Create morph volumes in a rectangular configuration through a mesh, along a line or nodelist, along a vector, or about an axis.
drag matrix (cyl)
Create morph volumes in a cylindrical configuration through a mesh, along a line or nodelist, along a vector, or about an axis.
drag lines (rect)
Create morph volumes in a rectangular configuration with the outer profile matched to selected lines and drag them through a mesh, along a line or nodelist, along a vector, or about an axis.


Figure 11. Profile Lines Dragged along a Line to Create Morph Volumes
drag nodes (rect)
Create morph volumes in a rectangular configuration with the outer profile matched to a list of nodes and drag them through a mesh, along a line or nodelist, along a vector, or about an axis.
drag lines (cyl)
Create morph volumes in a cylindrical configuration with the outer profile matched to selected lines and drag them through a mesh, along a line or nodelist, along a vector, or about an axis.
drag nodes (cyl)
Create morph volumes in a cylindrical configuration with the outer profile matched to a list of nodes and drag them through a mesh, along a line or nodelist, along a vector, or about an axis.
auto-tangent
If tangency is selected, a continuous tangency condition will be applied across adjacent edges for the new morph volumes. Tangency ensures smooth morphing between morph volumes.
Note: Tangency conditions can extend across multiple morph volumes, meaning that handle movements at one end of the morph volume matrix can potentially affect every morph volume.
buffer % Specify the amount of empty space between the selected nodes or elements and the faces of the created morph volumes, based on the average size of the morph volume to be created. For instance, if a mesh measured 30x30x30 and a 10% buffer percentage was selected, the morph volume would be created measuring 36x36x36, which would give it a 10% (3 unit) buffer zone between each side and the enclosed mesh.
drag direction
along mesh
Drag the morph volume faces or elements along a line that runs roughly through the centroid of the selected nodes or elements.
along line
Drag the morph volume faces or elements along a line.
along nodelist
Drag the morph volume faces or elements along a line created from a list of nodes.
along vector
Drag the morph volume faces or elements in the specified direction. Use the toggle to select whether to drag for a specified distance or far enough to enclose the selected elements or nodes.
about axis
Spin the morph volume faces or elements about the specified axis. Use the toggle to select whether to drag through a specified angle or far enough to enclose the selected elements or nodes.
Note: Available when any of the "drag" creation methods are selected.
elems (drag elements) Select the elements you wish to drag.
enclose elems / enclose nodes Choose the entities that you wish the morph volume to enclose.
fit method Choose what the morph volume can do after creation to better fit the elements that it encloses.
shrink depth
Shrink the morph volume only in the direction of the screen vector (the corners will remain at the positions you selected).
Note: Only available when the creation method is set to pick on screen.
no shrinking
Do not apply shrinking to the morph volumes upon creation, but you may shrink or fit them later using the shrink mvols or fit faces features in the update mvols subpanel, or you may adjust them manually by making the mvols inactive and then morphing their handles.
shrink mvols
Shrink the morph volumes, which are created, around the mesh to match the specified buffer % value. The implicit mode algorithm will be used to perform the shrinking.
slide faces
Slide the faces normal to their orientation, maintaining the orientation angles and shapes of the faces.
tilt faces
Change the orientation angles of the faces, but maintain the shapes.
fit faces
Change the shapes of the faces if there are mid-handles on the face edges, otherwise it will tilt the faces.
global system / local system
global system
Create the new morph volume with coordinates relative to the default global coordinate system.
local system
Add a syst selector to allow you to pick the desired local coordinate system to associate the new volume with.
handle placement
Choose where the morph volume's handles are located.
Note: If you choose corners and edges, you must also specify the number of handles to create on each edge. You can specify 1 to 5 edge handles, which will be evenly spaced along the edge between the corner handles.
morphvolumes Select the existing morph volumes that you wish to reflect in order to create new volumes.
Note: Only available when the creation method is set to reflect mvols.
node list Select the nodes that you wish to enclose or drag.
Note: Only available when the creation method is set to pick and enclose or drag nodes.
on drag Specify the number of morph volumes that will be created along the drag direction. Thus, if you had selected six morph volumes and set on drag to 5, a total of 30 (6 x 5) new morph volumes will be created.
Note: Only available when the creation method is set to any of the "drag" options.
on face x On face x and on face y are the number of morph volumes which will be created for a rectangular matrix in the local x and y directions. The local x direction is determined as being either the global x axis as projected on to the plane normal to the drag direction, or if the drag direction is perpendicular to the global x axis then the projection of the global y axis is used. The local y direction is perpendicular to the local x direction and the drag direction.
Note: Only available when the creation method is set to drag matrix (rect), drag lines (rect), or drag nodes (rect).
on face y On face x and on face y are the number of morph volumes which will be created for a rectangular matrix in the local x and y directions. The local x direction is determined as being either the global x axis as projected on to the plane normal to the drag direction, or if the drag direction is perpendicular to the global x axis then the projection of the global y axis is used. The local y direction is perpendicular to the local x direction and the drag direction.
Note: Only available when the creation method is set to drag matrix (rect), drag lines (rect), or drag nodes (rect).
register all inner nodes

Associate all nodes enclosed by the morph volume with that volume.

When registering nodes to multiple morph volumes or all morph volumes, nodes will only be registered to the morph volume that they are inside. This provides a convenient way to register masses of nodes rapidly. Nodes that are selected to be registered but that do not lie within a morph volume will still be registered to all morph volumes but will not be affected by any morph volume morphing. However, when switching from inactive to active status for morph volumes, all registered nodes are re-registered to the morph volumes, which allows for nodes to become registered to a new morph volume, or all morph volumes, depending on their location.

The process of registering nodes allows you to control which nodes are morphed by morph volumes and which are not (such as when you are matching one mesh to another), and allows you to make one morph volume dependent on another by registering its handle nodes to a morph volume that encloses it.

After morphing morph volumes while they are inactive, unregistered nodes may end up inside the morph volumes. These will not be automatically registered when the morph volume status is switched to active. You will need to register these new nodes manually.

Note: Only available when the creation method is set to pick and enclose or reflect mvols.
r density Specify the r density, which is the number of morph volumes which will be created in the radial direction.
Note: Only available when the creation method is set to drag matrix (cyl), drag lines (cyl), or drag nodes (cyl).
symmetries Select the reflective symmetry around which you wish to reflect the specified morphvolumes.
Note: Only available when the creation method is set to reflect mvols.
t density Specify the t density, which is the number of morph volumes that will be created in the outer layer about the drag axis.
Note: Only available when the creation method is set to drag matrix (cyl), drag lines (cyl), or drag nodes (cyl).
X density / Y density / Z density Specify the number of morph volumes that will be created along each axis.

For example: when creating a single-layer, 3 x 3 matrix of volumes around a 2D mesh, you might specify 3 for the X and Y densities and 1 for the Z density.

For a cylindrical matrix, the x density refers to the number of morph volume layers in the radial direction and the y density refers to the number of morph volumes in the outermost ring.

Note: Only available when the creation method is set to create matrix.

Update Mvols Subpanel

Use the Update Mvols subpanel to update the handle and tangency conditions of morph volumes, register or unregister nodes for morph volumes, shrink morph volumes, fit the faces of morph volumes, join and equivalence morph volumes, or delete all empty morph volumes.
Option Action
auto-tangent
If tangency is selected, a continuous tangency condition will be applied across adjacent edges for the new morph volumes. Tangency ensures smooth morphing between morph volumes.
Note: Tangency conditions can extend across multiple morph volumes, meaning that handle movements at one end of the morph volume matrix can potentially affect every morph volume.
buffer % Specify the amount of empty space between the selected nodes or elements and the faces of the created morph volumes, based on the average size of the morph volume to be created. For instance, if a mesh measured 30x30x30 and a 10% buffer percentage was selected, the morph volume would be created measuring 36x36x36, which would give it a 10% (3 unit) buffer zone between each side and the enclosed mesh.
Note: The fit through nodes option is only available for fit faces operations performed by face.
by face / by mvol Select either by face or by mvol, then select the morph volume faces or morph volumes to be fitted.
Note: When you select by mvols, all external faces of the morph volume will be fitted.
fit method Choose the type of fitting applied to the faces.
slide faces
Slide the faces normal to their orientation, maintaining the orientation angles and shapes of the faces.
tilt faces
Change the orientation angles of the faces, but maintain the shapes.
fit smooth
Smoothly curve the face to closely match the selected nodes
fit wavy
Fit a trigonometric shape to match the selected nodes.
fit approx
Smoothly curve the face to roughly match the selected nodes.
free inner faces Move the inner faces (faces shared by more than one selected morph volume) freely during the shrinking operation.
handle placement:
Choose where the morph volume's handles are located.
Note: If you choose corners and edges, you must also specify the number of handles to create on each edge. You can specify 1 to 5 edge handles, which will be evenly spaced along the edge between the corner handles.

When performing a fit faces operation, choose to keep the current handles (use current) or specify a number of handles per edge after the volume faces are fitted (handles/edge).

implicit mode / explicit mode Choose the algorithm used when shrinking the selected morph volumes.
implicit mode
Shrink morph volumes using internally calculated sensitivities.
This option is faster than explicit mode, however it usually requires twice as many iterations (30-50 is usually enough) to converge.
explicit mode
Shrink morph volumes using externally calculated sensitivities.
This option is slower than implicit mode, however it usually converges in 15 to 20 iterations.
max. iter Specify the maximum number of iterations to perform when shrinking morph volumes.
morphvolumes Select the existing morph volumes that you wish to update.
project normal / project by vector Choose whether to project the faces normal to their current orientation or along a vector. If using a vector, point the vector in the direction the target nodes or elements will end up relative to the faces, after the faces have been fitted.
register all inner nodes

Associate all nodes enclosed by the morph volume with that volume.

When registering nodes to multiple morph volumes or all morph volumes, nodes will only be registered to the morph volume that they are inside. This provides a convenient way to register masses of nodes rapidly. Nodes that are selected to be registered but that do not lie within a morph volume will still be registered to all morph volumes but will not be affected by any morph volume morphing. However, when switching from inactive to active status for morph volumes, all registered nodes are re-registered to the morph volumes, which allows for nodes to become registered to a new morph volume, or all morph volumes, depending on their location.

The process of registering nodes allows you to control which nodes are morphed by morph volumes and which are not (such as when you are matching one mesh to another), and allows you to make one morph volume dependent on another by registering its handle nodes to a morph volume that encloses it.

After morphing morph volumes while they are inactive, unregistered nodes may end up inside the morph volumes. These will not be automatically registered when the morph volume status is switched to active. You will need to register these new nodes manually.

registered nodes / fit to nodes / fit to elems Select what to fit the selected morph volumes to.

If you are fitting to selected elements or nodes you are also given entity collectors to select them, as well as the option to register those nodes to the morph volumes being fit.

When performing a register nodes operation, only the registered nodes entity collector displays.

single morph volume / multiple morph volumes / all morph volumes When performing a register nodes operation, choose which morph volumes you wish to register nodes to. The "single" and "multiple" options present entity collectors, while the "all" option requires no further input.
smoothness Higher values will give a flatter result and lower numbers will allow more curvature. The smoothness does not apply when using slide faces or tilt faces.
tolerance When joining mvols with the equivalence option, specify a tolerance to determine which volumes will join. If the faces of two morph volumes are within the tolerance distance from each other and have been selected, they will be joined. (Unselected volumes will not be joined regardless of tolerance.)
update operation Choose the type of update you wish to perform.
update mvols
Select morph volumes and update their handles or tangency.
join mvols
Combine two morph volumes, each of which is chosen with an individual morphvolume entity collector.
You can then:
join at midpoint
Stretch the two morph volumes that you choose equally to join at the midpoint between their closest faces.
first to second
Stretch the first morph volume that you choose to meet the second morph volume that you chose (the second volume will not stretch at all).
second to first
Stretch the second morph volume that you choose to meet the first morph volume that you chose (the first volume will not stretch at all).
equivalence
Join all of the morph volumes that you choose whose faces are within the specified tolerance at their respective midpoints.


Figure 12.
shrink mvols
Shrink selected morph volumes to more tightly fit their registered nodes.
fit faces
Curve or otherwise alter mvol faces to better fit the relevant elements.


Figure 13.
register nodes
Register nodes to a morph volume.
delete empty
Delete any morph volumes that have no registered nodes. This allows you to easily pare down large 3D matrices of morph volumes, retaining only the volumes that contain parts of your model.

Update Edges Subpanel

Use the Update Edges subpanel to modify the properties of a morph volume's edges individually. You can add or remove mid-nodes, fit the edge to a node list, or change edge tangency.
Option Action
by edges / by nodes / by mvols Choose how to ends will be selected.
by edges
Select the edge directly using the end node selector.
by nodes
Select node a and node b. These nodes should be the corner handles of the edge that you wish to free from tangency. Node a will be freed from tangency between its adjacent edges.
by mvols
Select one or two sets of morph volumes, and possibly also a vector or coordinate system depending on the option selected.
Note: Only available when updating ends.
connect all edges / connect edges between / connect along vector / connect radial edges / connect circum. edges
connect all edges
Connect all edges on the selected morph volumes which lie roughly in the same direction and meet at a common corner node.
connect edges between
Connect all edges on the first group of selected morph volumes to edges on the second group of selected morph volumes which lie roughly in the same direction and meet at a common corner node. Shared edges between the groups will not be connected.
connect along vector
Same as the connect all edges option except that it will only apply to edges which run roughly parallel to the specified vector. This allows you to connect edges running along the z-axis, for example.
connect radial edges
Same as the connect all edges option except that it will only apply to edges that run radially with respect to the specified system. This option works best with cylindrical type matrixes of morph volumes.
connect circum. edges
Same as the connect all edges option except that it will only apply to edges which run circumferentially with respect to the specified system. This option works best with cylindrical type matrices of morph volumes.
Note: Only available when updating ends, by mvols, with continuous tangency.
create handles Create handles on the edge after it is updated.
end node Select an edge by selecting one of its end points. An edge runs from one corner of a morph volume to the other regardless of any tangency conditions.
Note: Only available when updating ends by edges.
fix along Edges which run roughly parallel to the specified vector will gain a fixed tangency.
Note: Only available when using update ends, by mvols, with fixed tangency.
free / fixed / master-slave / continuous Select a types of tangency to apply.
Free
Remove tangency from a selected edge, so that its shape is not affected by the edges attached to it.


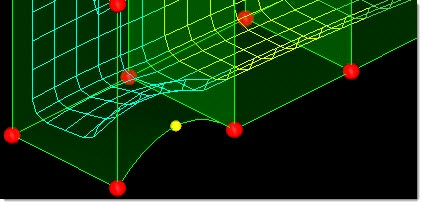
Figure 14. No Correlation Between the Slopes of the Edges
Fixed
Fix one end of the edge so that the end’s slope is equal to a vector that you specify. For example, you can make one end of an edge begin with a flat slope.


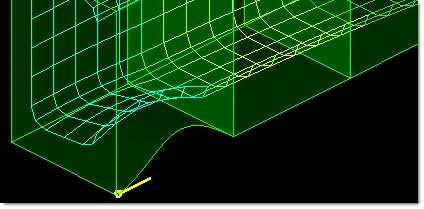
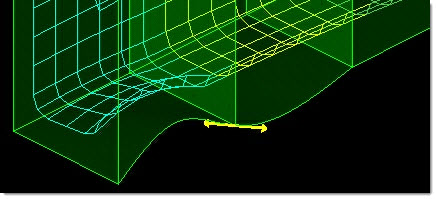
Figure 15. Left End of the Curved Edge is Fixed Relative to the Y-Axis. The slope of the line is now enforced at one end and free at the other while still passing through the handles. When updating edge tangencies, the handles are not shown (for clarity) and tangency symbols are drawn at the ends of the edges where they apply.
Master/Slave
One edge (the master) is tangent to another edge (the slave) with the end of the slave edge being forced to meet the curvature at the end of the master edge. This is similar to setting one corner of the slave edge to be fixed (as for fixed tangency, above) but the corner’s slope is fixed relative to the slope of the master edge, instead of being fixed relative to a vector or axis. This is useful for keeping one morph volume (and the mesh inside) constant while still maintaining tangency between it and surrounding morph volumes.


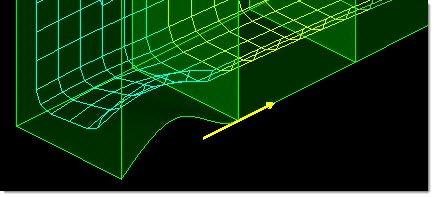
Figure 16. Left Edge is Slaved to the Right Edge. The master edge is unaffected by the slave edge. The slave edge must remain tangent to the master edge.
Continuous
Create a consistent slope at a shared corner of two connected morph volumes.


Figure 17. Edges Form a Continuous Spline
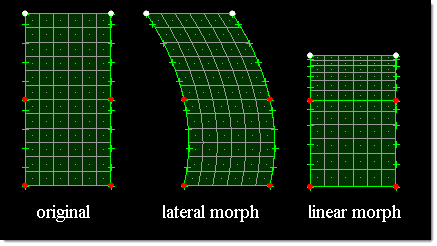
Note: Tangency implies continuity between neighboring morph volumes, which means that morphing applied to one morph volume will affect all other morph volumes whose edges are connected through tangency. This is true for morphing in all directions.


Figure 18. Morph Volumes are Connected with Continuous Tangency. Notice how the mesh remains continuous across the boundary between the morph volumes regardless of the morph direction. For the lateral morphing case this means that elements in the lower morph volume will be shifted to the right when the upper morph volume is moved to the left. For the linear morphing case this means that the elements in the lower morph volume away from the boundary will be stretched and elements near the boundary will be compacted, which prevents an abrupt change in element size. Also notice the uneven distribution in compaction for the upper morph volume.
Note: Only available when using update ends and by mvols.
free all edges / free edges between / free along vector / free radial edges / free circum. edges Choose a method for selecting the edges to free.
free all edges
Free any tangency condition for any edges on the selected morph volumes.
Note: For master-slave and continuous type tangencies, both edges must lie on the selected morph volumes.
free edges between
Free master-slave and continuous type tangencies where one edge of the tangency lies in the first group of selected morph volumes and the other edge of the tangency lies in the second group of selected morph volumes.
free along vector
Same as the free all edges option except that it will only apply to edges which run roughly parallel to the specified vector. This allows you to free edges running along the z-axis, for example.
free radial edges
Same as the free all edges option except that it will only apply to edges which run radially with respect to the specified system. This option works best with cylindrical type matrices of morph volumes.
free circum. edges
Same as the free all edges option except that it will only apply to edges which run circumferentially with respect to the specified system. This option works best with cylindrical type matrices of morph volumes.
Note: Only available when using update ends and by mvols.
master, slave Select the master morph volumes and slave morph volumes.
Note: Only available when using update ends, by mvols, and with master-slave tangency.
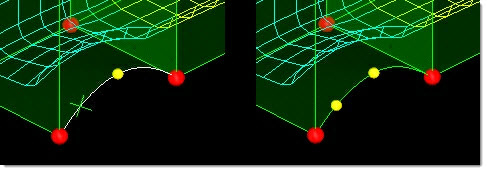
mid-nodes on edge / add mid-node
mid-nodes on edge
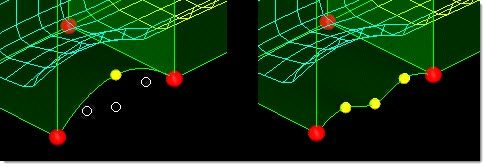
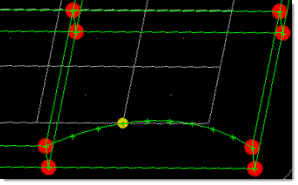
Specify the number of desired mid-nodes. The graphics will display the positions of the new mid-nodes with X marks. The new positions will be evenly spaced along the edge.


Figure 19.
add mid-node
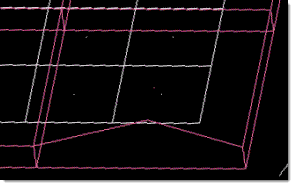
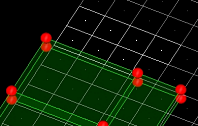
Specify the relative position (from 0 to 1) of the new mid-node, or you can click on the edge where you want the new mid-node to be, or you can click a node in the model and have the position of the new mid-node be aligned with that node. An X mark will appear to show you where the new mid-node will be created.


Figure 20.
When updating nodes by node list, the mid-nodes for the edge will be updated at the nodes that you selected, or if you selected only the corner nodes, the edge will be updated to have no mid-nodes.


Figure 21.
Note: Available when updating nodes.
node a, node b Specify the ends of the desired edge.
Note: Available when updating nodes by pick end nodes, or when updating ends by nodes.
pick edge / pick end nodes / node list Choose how to select the edge that you wish to update nodes for.
Note: Available when updating nodes.
tangencies Select a color to display the tangency markers (arrows).
Note: Available when updating ends.
update nodes / update ends / delete mid-nodes Select the type of edge update you wish to make.

Split/Combine Subpanel

Use the Split/Combine subpanel to combine multiple morph volumes into a single larger one, or to split a morph volume into multiple smaller ones.
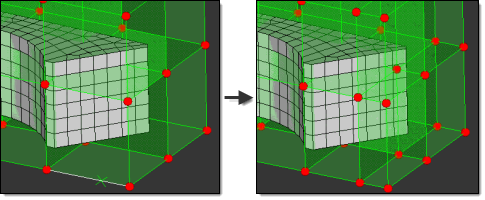
Any split or combine operations you perform in a matrix of morph volumes will propagate through the matrix along the vector of the split-line (or the edge that is being removed in a combine operation).
Note: If a split or combine operation cannot be propagated through the morph volume matrix it will not be performed for any morph volumes.
Figure 22 shows this with regard to a split. The middle bottom edge was chosen for splitting roughly 2/3 of the way along its length (marked by the green "x"). The split propagated upward through the matrix. This propagation is done intentionally, to maintain continuity within the matrix of morph volumes.


Figure 22.
Option Action
by edges / by nodes When splitting morph volumes, choose how you specify the location of the split.
by nodes
Select a node a and a node b.
by edge
Click the edge you wish to split.
combine mvols / split mvols Choose the type of operation to perform.
create handles When splitting a morph volume, create handles on the new morph volumes.

Clear this checkbox to create nodes, but not handles on the new volumes' edges.

keep tangent Set the edges of the new (combined) morph volume to continuous tangency with the edges of morph volumes adjacent to it.

If you clear this checkbox, the new (combined) morph volume's edge curvature will not affect or be affected by the edge curvature of the volumes adjacent to it.

Note: Available when combine mvols is selected.
make tangent Make the edges of the newly-created morph volumes tangent with the volumes adjacent to them.
Note: Available when split mvols is selected.
morph volume Select the volumes that you wish to combine.
Note: Available when combine mvols is selected.
single split / # of splits
single split
Specify the relative position (from 0 to 1) along the edge where you want the split to occur, click on the edge where you want the split to occur, or click a node in the model with which you want the split to be aligned.
For example, to split at the exact mid-point (creating two identical new volumes of half the original width), enter 0.5. By comparison, a value of 0.2 would still result in two morph volumes, but the one closest to node a would be only 1/5th as wide as the original distance between node a and node b. Instead of entering a value, you can click a spot on the edge, or a node in the model, to have HyperMorph calculate the distance ratio for you. An X marks the spot.
# of splits
Specify the number of split-lines to create.
For example, two split-lines will split a morph volume into three. HyperMorph places the number of split-lines that you specify equally-spaced along the length of the edge. HyperWorks X marks each split location with an X.

Save/Load Subpanel

Use the Save/Load subpanel to save or load morph volumes and morphed shapes to or from a file.
Option Action
file: Specify the file path and name of the morph volume file, either the file to save mvols to, or the one to load them from. You can enter the filename and path, or click browse to navigate to and select it.
morph volumes Select the mvols that you wish to save to the specified file.
register all inner nodes Automatically assign mesh nodes to the loaded morph volumes.
save mvols / load mvols Choose whether the specified file will be saved or loaded.
save shapes Save shapes (morphs) to the same file as morph volumes.

Convert Subpanel

Use the Convert subpanel to convert morph volumes to hexahedral elements, and convert hexas to morph volumes.
Note: Converting complex morph volumes to hexa elements will generally result in the loss of some edge detail, because hexas can only have (at most) one edge node. This means that morph volumes with more than one node or handle along their edges will be approximated with a single node between the corner handles. Morph volumes are always converted into second order hexas, whether or not they include such extra handles.


Figure 23. Curved Morph Volume Converted to a Second Order, Hex-Mesh Element
Option Action
auto-tangent
If tangency is selected, a continuous tangency condition will be applied across adjacent edges for the new morph volumes. Tangency ensures smooth morphing between morph volumes.
Note: Tangency conditions can extend across multiple morph volumes, meaning that handle movements at one end of the morph volume matrix can potentially affect every morph volume.
Note: Only available when converting hexas to mvols.
elems Select the elements that you wish to convert in your model, or use the extended entity selection menu.
Note: Only available when converting hexas to mvols.
handle placement
Choose where the morph volume's handles are located.
Note: If you choose corners and edges, you must also specify the number of handles to create on each edge. You can specify 1 to 5 edge handles, which will be evenly spaced along the edge between the corner handles.
Note: Only available when converting hexas to mvols.
hexas to morphvolumes / morphvolumes to hexas Choose which action will be performed.
morph volumes Select the mvols that you wish to convert.
Note: Only available when converting mvols to hexas.
register all inner nodes Automatically assign each of the nodes located within a new morph volume to that volume.
Note: Only available when converting hexas to mvols.

Parameters Subpanel

Use the Parameters subpanel to change basic settings of morph volumes, such as the handle size, the way that they are drawn, or the method of interpolation for edge curvature. You can also make morph volumes inactive (or reactivate them) so that you can move the volume handles to better fit your mesh without morphing the mesh in the process.
Option Action
face drawing Choose how the flat faces of morph volumes are drawn.
Wireframe
Draw only the morph volume edges and handles. Do not color the face at all.
Transparent (1, 2, or 3)
Draw the faces semi-opaque; higher numbers mean more opacity.
Opaque
Set the morph volumes' transparency to zero.
global influences Choose how morph volumes respond to global influences.
Direct influence
Global handles directly affect each node.
Hierarchical influence
Global handles affect the individual domain handles within the global domain, and they in turn affect the nodes within their domains.
Mixed method
Global handles move the local handles, as for hierarchical, but they also apply the direct method to any nodes within the global domain's influence that are not part of a local domain. Such nodes otherwise would not morph at all when using the hierarchical method, causing mesh distortion at the local domain boundaries.
handle size Specify the radius of corner node handles, the largest type of handle used by morph volumes. Other handles are drawn slightly smaller and in a different color. The units used for this setting are the same as those used by your model.
Interpolation mode Choose how edge curves are calculated.
Spline (default)
Generally produces the best results.
Lagrange
A polynomial method, which may produce "wilder" curves for widely varying handle movements. For complicated curves the spline option is used even if this parameter is set to Lagrange.
morph volume solver Choose which solver is used for determining the morphing of the nodes inside the morph volumes.
Standard
Map the inner nodes to a position inside the morph volume and then use a reverse mapping process to determine where the nodes belong after the morph volume is morphed. Morph volume tangencies and edge curvature is respected.
Kriging
Apply the kriging algorithm for the morph volumes using only the handle positions as guides. Since the kriging algorithm is linear and morph volumes with tangencies have curved edges, the movement of the inner nodes may not match the shape of the morphed volumes. Increase the number of mid-side nodes if better correlation is desired.
morphvolumes (color) Select a color to assign to morph volumes.
mvols: active, inactive, or skin only Turn the morph volumes' ability to affect the mesh on and off, and/or delay morphing of the interior of solid meshes.
mvols: inactive
Change the shape and size of morph volumes (on the morph panel) to better fit your mesh without actually altering/morphing the mesh itself. After adjusting the mvols, you can then return to the parameters subpanel to set them back to active and resume normal morphing behavior.
mvols: active / mvols: skin only
Automatically re-registers all currently registered nodes. HyperMorph will first try to register a node in its current morph volume; if that is unsuccessful it will register it to any morph volume. Unregistered nodes are unaffected, even if they now lie within a morph volume.
mvols: skin only
Delay the morphing of any nodes inside of a solid mesh until solve is clicked. This allows you to more rapidly morph your model if it contains a large number of nodes while still being able to see what affects your morphing is having on the model. To use this feature, switch the selector to mvols:skin only, make any number of shape changes to your morph volumes, and then click solve to morph the interior nodes.
Note: Switching the selector away from mvols:skin only will automatically trigger the morphing of the nodes inside the solid mesh.
pts for edge draw Specify how many points each morph volume edge uses to represent curves. Use larger numbers for smoother curves, or smaller numbers for faster rendering. The default number is ten.
register tolerance Specify how far outside the boundaries, relative to the size of the morph volume, a node may be from a given morph volume to be registered to it. Thus, larger values allow nodes further outside a volume to still map to it.
Note: Nodes near the boundary between two morph volumes maybe mapped to either one.

Command Buttons

Button Action
combine Combine selected mvols into one.
convert Convert mvols to hexas or vice-versa
create Create a new mvol.
delete Delete the selected entities.
fit Fit mvols to their registered mesh nodes as described in the update subpanel.
join Join selected mvols together.
Note: The volumes are not combined into a single volume; they simply share an edge (This differs from combine).
load Load the specified file.
reject Reject the creation or update (tangency, split/combine, and so on) of a morph volume.
review Fill the node selector with the currently registered nodes. Use the left and right mouse buttons to select and unselect nodes to be registered.
save Save the specified file.
shrink Shrink the mvols in accordance with your specifications.
split Split the specified mvol into two.
update Update the selected mvol nodes or handle placement.