Material Table

Use the LS-DYNA Material Table to easily create and edit materials.

To access the Material Table, click Material Table on the Utility menu. All the existing materials are retrieved and populated in the table.

From the Material Table, you can also merge identical materials, search for duplicate materials, and change the properties of materials.

When you first display the Material Table, all materials are listed in the table, showing the material's ID, name, type, description, list of components in which it is used, and the RHO, E, and Nu values.

Materials in the table can be selected by clicking the row, which is then highlighted in blue. Many functions are performed by selecting materials in the table and choosing an option from the context menu or clicking a button below the table. Shift-click and Control+click can be used to select multiple rows. Refer to the links below for details about using the Material Table.

Customize Views of the Material Table

The Material Table initially lists all existing materials, but you can sort and filter the list to more easily identify materials that you want to work with.
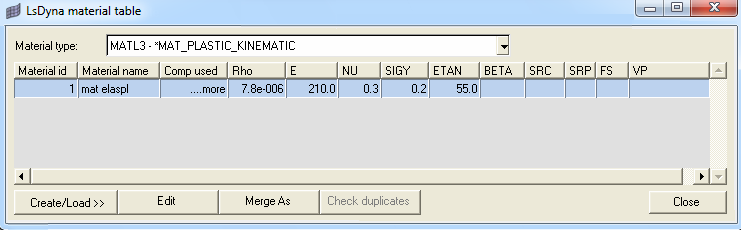
Each of the columns in the table can be used to sort the list. Click the column heading to sort by that characteristic, such as ID number or material type. To view only materials of a particular type, select that type in the Material type drop-down at the top of the window. For example, if you want to identify materials that are not used so you can delete them, you can click the Comp used column heading to quickly group together all materials that contain the value "No", which indicates that none of the components use the material.
Note: To view all material properties in the table, select a material type from the drop-down. When all material types are shown in the table, only the RHO (density), E (Young's modulus), and Nu (Poisson's ratio) properties appear. However, when a particular material type is displayed, all the relevant properties for that material type also appear in the table, as shown in the image below.


Figure 1.
The Material Table also enables you to view the model's components based on the material used. These options are available by selecting Display from the menu that appears when you right-click anywhere in the table. Options include:
  • Viewing only the selected materials
  • Hiding the selected materials
  • Viewing all or none of the materials
  • Adding the selected materials to the current display
  • Reversing the current display option

Once you make your selection, the corresponding components appear or become hidden in the graphics area.

Create, Edit and Load Materials

You can create, edit and load materials all from within the Material Table.

Materials can be added or modified with the Create/Load and Edit buttons or by selecting the same options in the menu that appears when you right-click anywhere inside the table. To save time, you can choose the Same As selection to begin creating a material with the same properties as the currently-selected material in the table.

When you create a new material, you specify a name and the type of material. The materials are conveniently organized into categories, including groups of recently used materials and only materials that exist in the model. These categories are further listed by the LS-DYNA keyword or type identifier, as shown in the following image.

You can add the material to the table immediately by clicking Create or by going to the Card Image panel to specify its properties by clicking Create/Edit.
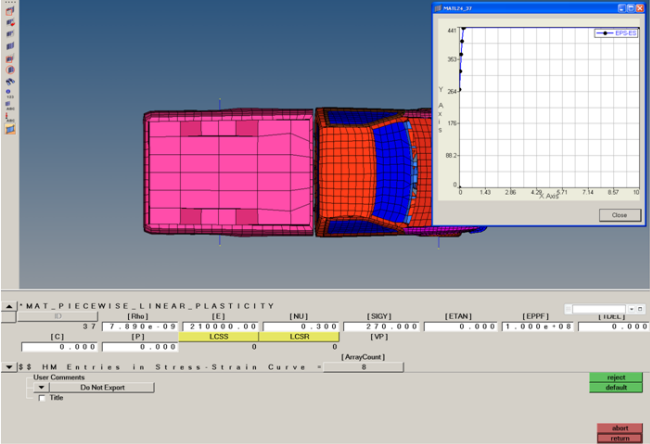
At any time you can select a material in the table and click Edit to open the material's card image. In the card image, you can modify values for the keyword's variables. In addition, the material's load curve appears in a pop-up graph, as shown below.


Figure 2.

Manage Materials

In addition to viewing, creating, modifying, and deleting materials, you can also identify duplicate materials, merge like materials into one, and rename materials.

The names of materials and the material IDs can be edited directly in the table. All other values must be edited with the Edit button, which opens the card image.

Materials that have the same properties can be identified using the Check duplicates button. This feature, which is only available when all materials are displayed in the table, finds all materials that have identical properties and returns them in result sets. You can then select each result set to view the matching materials. Optionally, you can merge the duplicate materials into one material using the Merge button, which is the same feature as described in the following paragraph.

When you select multiple materials from the table, you can merge them into one of the selected materials using the Merge As button. Typically this action is performed on materials with like properties to simplify a model, although it can be performed on dis-similar materials with all selected materials taking on the properties of one of the materials. When materials are merged into one, the remaining materials still exist and appear in the table, but do not have any components assigned to them.

Sort Materials

  1. Click the column heading of the criteria by which you want to sort.
  2. Click the column heading again to list the materials in reverse order.

See Customize Views of the Material Table to learn about other ways to filter the list of materials in the table.

Create New Materials

You can create a new material, or create a new material based on an existing material.

Create a New Material

  1. Click Create/Load and select New from the menu.
    New fields appear at the bottom of the Material Table.
  2. Type a name for the material in the New Material Name field.
  3. Select a material type from the drop-down list.
    The list expands to categories of material types, and also sorts them by keyword or material ID. You can view the complete list of material types under the All category.
  4. Click Create/Edit to open the material card image to specify the properties, or click Create to add the material to the table without immediately specifying any properties.
  5. Click return to exit the Create/Load mode.

Create a New Material Based on an Existing Material

  1. Select a material in the table that you want to use as the basis for a new material.
  2. Click Create/Load and select Same as from the menu.
    New fields appear at the bottom of the Material Table. The material you selected appears in the Selected material field.
  3. Type a name for the material in the New Material Name field.
  4. Click Create/Edit to open the material card image to specify the properties, or click Create to add the material to the table without immediately specifying any properties.
  5. Click return to exit the Create/Load mode.

Edit a Material's Properties

  1. Select a material in the table that you want to edit.
  2. Click Edit.
    The card image for the material appears and, if applicable, the load curve appears in a pop-up window.
  3. Modify values in the card image and click return to go back to the Material Table.

Merge Materials

  1. In the table, select the materials you want to merge.
    Use Shift+click to select multiple, consecutive rows and Control+click to select non-consecutive rows.
  2. Click Merge As.
    The Material Table expands to include new fields for merging materials.
  3. Select the material ID to use as the new material in the Retain material(id) field.
  4. Click Merge.
    The components for each of the selected materials are merged into the material you selected. The remaining materials still exist and are listed in the table, but they are not assigned to any components.

Find Duplicates

  1. Ensure that ALL is selected in the Material type field.
  2. Click Check duplicates.
    The Material Table expands to include new fields for handling duplicate materials.
  3. Choose a group number from the View materials in duplicate group field.
    The materials in that group appear in the table. The results for the duplicates check are divided into consecutively numbered groups of the same material type.
You can easily merge the duplicate materials using the Merge button. See Merge Materials for steps on using the merge feature.

To view another result group of duplicate materials, select another group number from the View materials in duplicate groups field. That group’s list of duplicate materials appears in the table.

View the Load Curve for a Material

  1. Select a material in the table for which a load curve ID has been defined.
  2. Click Edit.
    The load curve appears in a pop-up window.

Export Data from the Material Table

  1. Select a material type or ALL from the Material type field to export only materials of a particular type or all materials, respectively.
  2. Right-click anywhere in the table and select Save and then CSV for comma- or semicolon-separated values or HTML for an HTML-based table.
    The Select output file dialog opens.
  3. Browse for or type a name in the File name field and click Save.
    The file containing material data is saved in the location you specified.