Configuring the Model Browser
Change the columns and entity types that display in the Model Browser and change browser options.

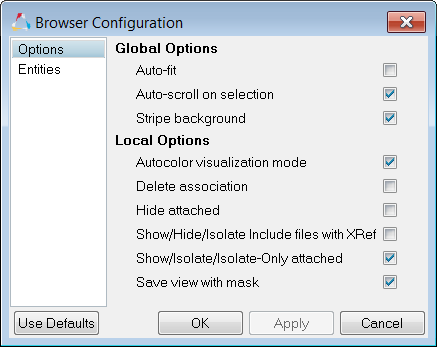
Figure 1. Browser Configuration Dialog
Entities Tab
To select entity types to display in the Model View, activate the checkboxes next to each desired entity type. A check mark indicates that the entity type will display in the browser. You can also use the select all, select none, and select reverse buttons in this mode.
Options Tab
- Global Options
-
- Autofit
- Automatically fits the selected entities to the graphics area whether using the context menu or the Selector, Show/Hide, or Isolate functionality to control the display.
- Autoscroll on selection
- Automatically opens the folder in the Model Browser, highlights the selected entity in the browser list, and then adjusts the browser list so that the highlighted entity is shown automatically. This functionality is only available when you select an entity using the Selector functionality in the graphics area. If the Autoscroll on selection option is not active, then HyperMesh will continue to open the folders automatically and highlight the entity in the browser list, however, the browser list will not adjust to show the selected entity.
- Stripe background
- Causes the browser tree to display a gray grid lines in the background, making it easier to distinguish individual lines within the browser. When turned off, the browser background is flat white.
- Local Options
-
- Autocolor visualization mode
- Change the graphics display based on the browser view mode you have selected. If Model or Component View is selected, then the visualization mode will change to "By Comp". If Material View is selected, then the visualization mode will change to "By Mat". If Property View is selected, then the visualization mode will change to "By Prop". If the Autocolor visualization mode is not active, then the visualization modes will not change automatically when you are in a certain browser view, instead, you will have to manually change the visualization mode from the Visualization toolbar.
- Delete association
- Open the Delete component(s) and unique associations dialog when Delete Advanced is selected from the context menu. When this box is checked off, the Delete component(s) and unique associations dialog does not open when Delete Advanced is selected from the context menu, and the entities uniquely related to the selected component are automatically deleted. Only available for components in the LS-DYNA user profile.
- Hide attached
- Mask the attached elements from the graphics area when you perform the Hide functionality on the following entities: loads, load collectors, load steps, groups and contact surfaces. This could be observed if the elements are currently displayed. This will not alter the display state to off, that is local display icon will not be Dimmed.
- Show/hide/isolate Include files with Xref
- Show, hide, isolate the contents of the Include files when you Show/Hide/Isolate the Include file. If you turn this option off, Show/Hide/Isolate will only affect the components and other HM entities that have graphics (vectors, systems, plies, laminates, loads) in the Include file of the Model, Solver, and ID Manger browsers.
- Show/Isolate/IsolateOnly attached
- Bring the attached elements to the graphics area when you perform the Show/Isolate/Isolate Only functionality on the following entities: loads, load collectors, load steps, groups and contact surfaces. This could be observed if the elements are currently masked or the elements belonging to the component's display state is off. This will also turn the local display icon to Bold if the component is currently with the display state off.
- Save view with mask
Command Buttons
- Click Apply to append the new settings without closing the window.
- Click OK to keep the new settings including those that are not applied and close the window.
- Click Cancel to discard the changes made that are not applied (keeping previous applied settings) and close the window.