The following table explains the elements and attributes of the above
.tsk file:
Table 1.
TSK File Element
Attribute
Valid Type
Function of the XML Attribute Type
Process
type= “TCL_PROC”
TCL_PROC
Specifies the language in which the task is authored. In this
example the programming language is ITCL.
name= “MathTask”
user-defined
Specifies the name of the task, which must be unique. This
attribute is unique to the HyperWorks context. In this example the name of the Task file is
MathTask.
The names of all HW tasks are located in
[ALTAIR_INSTALL]\hw\bin\win64\Packaging.xml.
impl= “MathTask.tcl”
user-defined
Points to the file that contains the implementation
information for the task.
In this example the execution logic
is contained in the file:
MathTask.tcl.
Note: This file must
be placed in the same location as the
*.tsk file.
Param
name= “operation”
user-defined
Defines the variable name used in the Implementation Task
file. The mapping between "name"and the
implementation file is shown here.
In this example the
variable name defined is operation.
datatype= “string”
string
int
Specifies the data type of the variable. Valid types are
string, integer and double.
In this example, the variable name
is of type string.
value= “ADD”
user-defined
Assigns a default value to the variable.
In this example
the variable name is assigned a default value of
“ADD”.
Input
name= “input_1”
user-defined
Defines the “variable name” that is used in the Implementation Task
file. The mapping between “name” and the
implementation file is shown here.
In this example the
“variable name” is defined as input_1.
datatype = “int”
string
int
double
Specifies the type of variable. Valid types are: string,
integer and double.
In this example, the variable name is of
type int.
value= “8”
user-defined
Assigns a default value to the variable.
In this example
the variable name is assigned a default value of
8.
Output
name= “output”
user-defined
Defines the variable name in the Implementation Task
file. The mapping between “name” and the
implementation file is shown here.
In this example the
variable name is defined as “output”.
datatype = “int”
string
int
double
Defines the type of variable. The valid types are string,
integer and double.
In this example the variable name is of
type int.
Note: While default values can be specified as
parameter input, the output is generated with the task
that is executed.
The following is an example of a Task file that contains entries for data type
defined as input and
output.
The table below explains the elements and attributes of the Task Implementation file
(*.tcl):
Table 2.
TCL File Element
Attribute
Output
Parameters
Input
name= “InputObject_1”
user-defined
Defines the variable name used in the Task Implementation
file. The mapping between “name” and the implementation file is
shown here.
In this example the variable name is defined as
InputObject_1.
datatype= “intDataClass”
user-defined
Defines the data type of the variable. Here the data type is
intDataclass.
Note: Prior to loading a task, the ITCL class
must be registered with HyperWorks Automate or sourced in the Tcl interpreter.
datavalue= “ ”
""
This field is for internal use and must remain null.
Output
name= “outputObject”
user-defined
Defines the variable name used in the implementation file.
The mapping between “name” and the implementation file is shown
here.
In this example the variable name is defined as
outputObject.
datatype= “intDataClass”
user-defined
Defines the data type of the variable. Here the data type is
the class, intDataclass.
Note: Prior to loading a task, the ITCL
class must be registered with HyperWorks Automate or sourced in the
TCL interpreter.
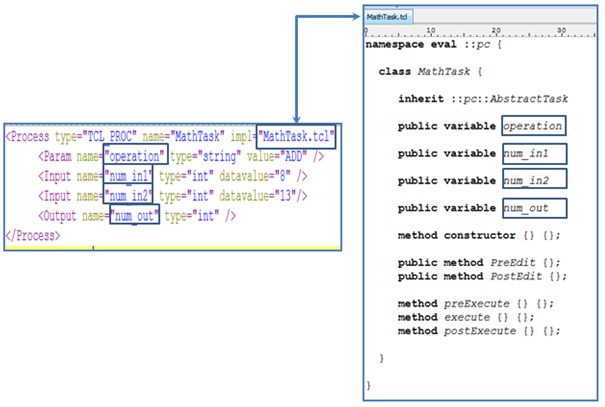
Authoring the Implementation Logic for a Task File
Implementing a Task with ITCL
The ITCL class that implements a task must inherit the abstract base
class ::pc::AbstractTask. The reference below shows how a sample
MathTask Implementation file inherits from ::pc::AbstractTask and maps
to a Task file. Figure 1.
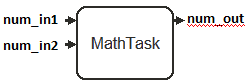
Graphically the above task is represented as follows: Figure 2.
Note: The variable names used in the Task file are represented as
port labels.
The class ::pc::AbstractTask forces the implementation of the following
functions:
PreEdit {}
PostEdit {}
preExecute {}
execute {}
postExecute {}:
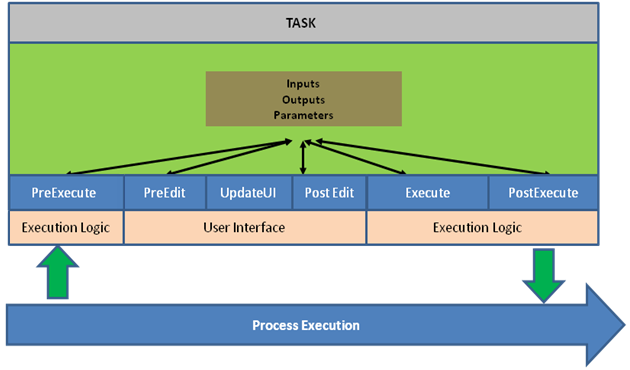
The following image shows the control flow of the functions. The User
Interface is kept separate from the execution. This separation prevents
the logic from being embedded into the User Interface, and therefore
implements the Model View Controller
architecture during the task development. Figure 3.
As you see in the figure above, the functions are classified into
the following categories:
Table 3.
Function Categories
Description
User Interface Functions
The functions PreEdit and PostEdit implement a
user interface for a task.
Execution Logic Functions
The functions PreExecute, Execute and PostExecute
implement the execution logic for a task.
Miscellaneous
Logger methods
ToolTip methods
UpdateUI methods
Implementing Task User Interface Functions with a MathTask
package requires Itcl;
namespace import ::Itcl::*;

namespace eval ::pc {

    class MathTask {

        #AbstractTask to be implemented by Tasks
        inherit ::pc::AbstractTask

        #Below is the list of operations
        public variable OperationTypes "ADD SUBTRACT DIVIDE MULTIPLY"

        #Below is a parameter type that was defined in the task file

        public variable operation;  #<Param name="operation" type="string" value="ADD" />

        #Below is an Input type that was defined in the task file

        public variable input_1;   #<Input name="input_1" type="int" datavalue="8" />
        public variable input_2;   #<Input name="input_2" type="int" datavalue="13"/>
        public variable output ;   #<Output name="output" type="int" />

        public variable tempvariable_1;
        public variable tempvariable_2;
        public variable tempoperation;

        #User Interference Methods
        public method PreEdit {} {};
        public method PostEdit {} {};

        #Execution Logic
        method preExecute {} {};
        method execute {} {};
        method postExecute {} {};

        method constructor {} {};

    }

}
Refer to the above example and note the following required actions:
The parameter variable and input and output variables defined in
the Task file must be declared in the class.
Inherit ::pc::Abstracttask to implement the functions:
PreEdit
PostEdit
preExecute
execute
postExecute
::Itcl::body ::pc::MathTask::PreEdit {} {


    #Get the Editor Object
    set edt [$this getEditor]
    $edt hidePropertyArea

    #Get the frame on which GUI must be packed
    set frm_base [$edt recess]

    #Pack the GUI required
    package require hwtk

    set tempoperation  $operation
    set tempvariable_1 $input_1
    set tempvariable_2 $input_2

    set lbl_taskLabel [hwtk::label $frm_base.taskLabel -text "MathTask"]
    grid $lbl_taskLabel -sticky w -pady 2 -padx 5;

    set lbl_operLabel [hwtk::label $frm_base.operationLabel -text "Math Operation"]
    set cmb_operTypes [hwtk::combobox $frm_base.operationComboxBox\
                                      -textvariable [::Itcl::scope tempoperation]\
                                      -values $OperationTypes]
    grid $lbl_operLabel $cmb_operTypes -sticky w -pady 2 -padx 5;

    set lbl_InputLabel [hwtk::label $frm_base.lbl_InputLabel1 -text "Input Number-1"]
    set ent_InputData  [hwtk::entry $frm_base.ent_InputData1\
                                    -inputtype integer\
                                    -textvariable [::Itcl::scope tempvariable_1]]
    grid $lbl_InputLabel $ent_InputData -sticky w -pady 2 -padx 5;

    set lbl_InputLabel [hwtk::label $frm_base.lbl_InputLabel2 -text "Input Number-2"]
    set ent_InputData  [hwtk::entry $frm_base.ent_InputData2\
                                    -inputtype integer\
                                    -textvariable [::Itcl::scope tempvariable_2]]
    grid $lbl_InputLabel $ent_InputData -sticky w -pady 2 -padx 5;

}
Refer to the above example and note the following required actions:
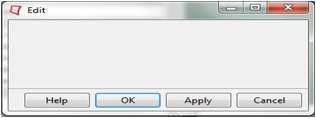
The example shows you how to implement the user interface for
the task. The following image shows the empty user
interface: Figure 4.
The function [$this getEditor] returns an Editor object.
You create the recess area of the frame from the object as
follows:
set edt [$this getEditor]
$edt hidePropertyArea

#Get the frame on which GUI must be packed
set frm_base [$edt recess]
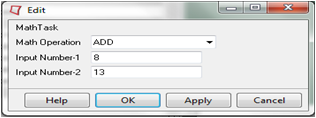
The implementation example using MathTask looks like the
following: Figure 5.
Note: PreEdit is called only once. Once the user interface
is built, Automate posts and unposts the user interface. In
case you need to update the user interface, you need to
implement the function, updateGui.
Table 4.
Code Snippet
Description
::itcl::body ::pc::MathTask::PreEdit {} {
#Get the Editor Object
set edt [$this getEditor]
$edt hidePropertyArea
#Get the frame on which GUI must be packed
set frm_base [$edt recess]
::itcl::body ::pc::MathTask::PostEdit {} {

    #The Values updated back
    set operation $tempoperation
    set input_1   $tempvariable_1
    set input_2   $tempvariable_2

}
Figure 6.
Click Apply to call the
PostEdit method. PostEdit is typically used to set
the modified data back to object.
Click OK to call the PostEdit method and
close the dialog.
Implementing Task Execution Functions with a MathTask
See the following example:
Table 5.
Code Snippet
Description
::itcl::body ::pc::MathTask::postExecute {} {
}
This function is called before the core execute
function.
This function implements the execution logic
for the task.
A simple math operation has been
implemented.
::itcl::body ::pc::MathTask::postExecute {} {
}
This function is called after the core execute
function.
Use this function to clean objects and clear
memory.
Updating the User Interface
In Automate the User Interface for a task is created only once. The
framework then efficiently displays and clears the UI, instead of
clearing and recreating it.
To update the UI, implement the following function:
Table 6.
Code Snippet
Description
::itcl::body ::pc::MathTask::updateGui {} {
}
This function lets you update the User
Interface.
Creating Tool Tips
To create tool tips for a task, implement the ToolTip function:
Table 7.
Code Snippet
Description
method ToolTip {} {
    set toolTipValue "ToolTip"
    return $toolTipValue
  }
This function lets you create custom, dynamic
tool tips.
The return value of the function is
displayed in the tool tip.