Manage Parts
About Parts, Part Assemblies, Part Instances
A part is an engineering representation of a physical part, and a part assembly is a group of part assemblies and/or parts. Part Instances, which are recognized from PDM, are automatically converted to Part Instances on import into HyperMesh.
Parts and Part Assemblies
HyperMesh supports CAE parts ( ![]() ) and part assemblies (
) and part assemblies (
![]() ) and
PDM parts (
) and
PDM parts (![]() ) and part assemblies (
) and part assemblies (
![]() ).
).
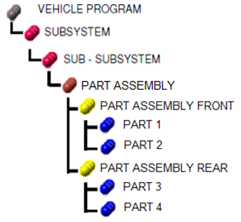 Figure 1. PDM BOM |
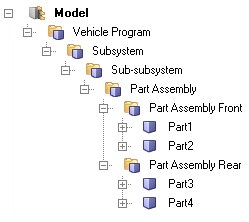 Figure 2. HyperMesh BOM |
If a part is comprised of multiple components, such as cast parts or tailor-welded blanks, you can perform actions such as visualization view modes, model management, and connector link definition at the part level.
Parts can be used to organize a physical part that is made up of multiple components in a CAE model as a single part.

Figure 3. Cast Part in Part Browser
In the Part Browser, collapsing all folders at the part level enables you to see all owned and referenced entities. Expanding folders at the part level displays a nested list of all referenced components and their entity specific attribute values which are shown in the respective columns.
Part Instances
The Part browser provides limited support for part instances of externally sourced BOMs.
Part Instances (![]() ) share UID and Part
names. The name assigned to child instances is incremented by
*.ixx, where xx indicates the number
of the child instance. The positioning of Part Instances is dictated by the
transformation matrix applied to the Part in the PDM system. Part Instances can also
be created interactively in a session. Upon creation, you will automatically be
prompted to transform the part via the Transform tool.
) share UID and Part
names. The name assigned to child instances is incremented by
*.ixx, where xx indicates the number
of the child instance. The positioning of Part Instances is dictated by the
transformation matrix applied to the Part in the PDM system. Part Instances can also
be created interactively in a session. Upon creation, you will automatically be
prompted to transform the part via the Transform tool.
In circular, symmetric, or rectangular patterns, certain parts may appear in a BOM multiple times. Typical examples include bolts, hinges, and symmetric parts.
Creating or saving part representations for instantiated parts saves a single representation in the repository. Importing instantiated parts positions them according to their respective 4 x 3 transformation matrices.
Create Parts, Part Assemblies, and Part Instances
Only CAE parts and part assemblies can be manually created in HyperMesh. PDM parts and part assemblies must be imported imported into HyperMesh.
The new part, part assembly, or part instance is created and displayed in the browser. Part assembly or part level entities cannot be modified or deleted.
Upon the creation of a part instance, you will automatically be prompted to transform the part via the Transform tool.
Import Parts, Part Assemblies, and Part Instances
Organize Part Assemblies and Parts
Organize part assemblies, parts, and components in your model.
- The Model is the root of the hierarchy in the browser. It represents the contents of the HyperMesh binary file and can contain part assemblies, parts, and components.
- A part assembly can contain part assemblies and parts. These can be both assemblies and parts.
- A part can only contain components.
-
Reorganize part assemblies, parts, and components in the Part Browser.
- From the Part Browser, left-click on an entity and drag and drop it to a new location.
In Figure 4, Component B is being reorganized into Part B.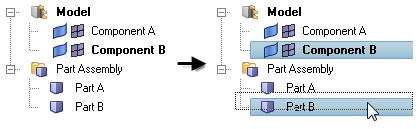 Figure 4.
Save Assemblies as HyperMesh Binary Files
The part assembly binary file is self-contained and includes the part assembly based hierarchy and attributes such as components, properties, and materials.
You can perform all necessary tasks such as geometry updates and meshing in the distributed HyperMesh binary file. The completed file can then be imported into the master HyperMesh session by importing a model.
- In the Part Browser, right-click on a part assembly and select Save As from the context menu.
- In the Save As dialog, save the binary in the representations directory for the current binary file.

Figure 5.
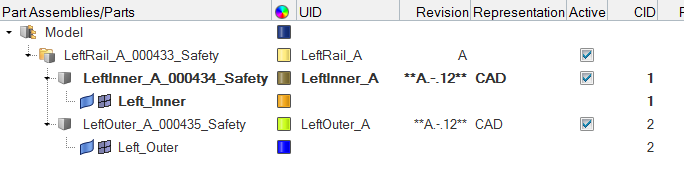
Figure 6.