Collectors are named organizational containers for collected entities. Collected entities are nameless entities which must
reside within one, and only one, collector. Collected entities are mutually exclusive to a collector.
Ale Fsi Projection entities provide a coupling method for simulating the interaction between a Lagrangian material
set (structure) and ALE material set (fluid).
Ale Reference System Curve entities defines a motion and/or a deformation prescribed for a geometric entity, where
a geometric entity may be any part, part set, node set, or segment set.
Ale Reference System Switch entities allows for the time-dependent switches between different types of reference systems,
that is, switching to multiple PRTYPEs at different times during the simulation.
Ale Tank Test keyword provides curve through an engineering approximation when control volume airbags only require
two engineering curves to define gas inflator and those two curves can be experimentally measured but the ALE inflator
needs one additional state variable - the inlet gas velocity which is impractical to obtain.
When source data is not in the correct location and overlaps with the target model, the tools provided in the Field Realization dialog can be used to transform the source model to the target model's location with linear transformation,
rotation, or scale methods.
Joint entities define the kinematic relationship between two bodies (for Ball, Cylinder, Revolute, Slider joints) or three
bodies (for DoubleSlider joints).
Laminate entities define laminates, which make up a laminated structure by defining the stacking sequence of ply entities
that make up the laminated structure.
Region entities store information used to facilitate and automate modeling practices and processes. It enables a selection
which can be common across design changes or other models, provided region data is the same.
Rigid wall entities provide a method for treating a contact between a rigid surface and nodal points of a deformable body.
In the LS-DYNA and Radioss user profiles, rigid walls can be created in the Model and Solver browsers.
Transformation entities define solver transformations, and are used to define a transformation sequence in a Position
entity, to be applied on a set of nodes or on a SolverSubmodel.
Browsers supply a great deal of view-related functionality in HyperMesh by listing the parts of a model in a tabular and/or tree-based format, and providing controls inside the table that
allow you to alter the display of model parts.
Perform automatic checks on CAD models, and identify potential issues with geometry that may slow down the meshing
process using the Verification and Comparison tools.
When source data is not in the correct location and overlaps with the target model, the tools provided in the Field Realization dialog can be used to transform the source model to the target model's location with linear transformation,
rotation, or scale methods.
When source data is not in the correct location and overlaps with the target model,
the tools provided in the Field Realization dialog can be used to
transform the source model to the target model's location with linear transformation,
rotation, or scale methods.
The transformed source model will be stored with the field entity and will remain
in the database for future reviews.
Open or import the target model.
Create and define a field entity:
In the Model Browser, right-click and select Create > Field from the menu.
In the Entity Editor, define the source model
data (results, csv, and current model).
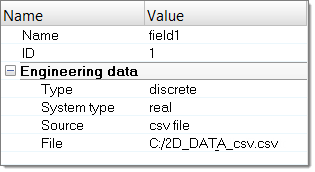
Realize the field:
In the Model Browser, right-click and select
Realize from the menu.
In the Field Realization dialog, define the
realization settings.
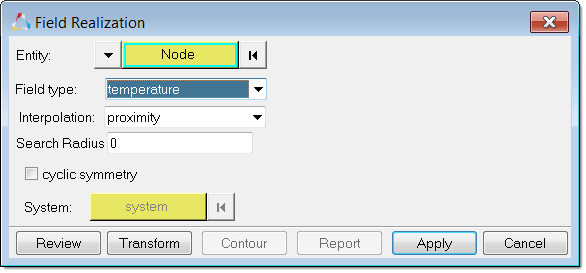
Click Apply.
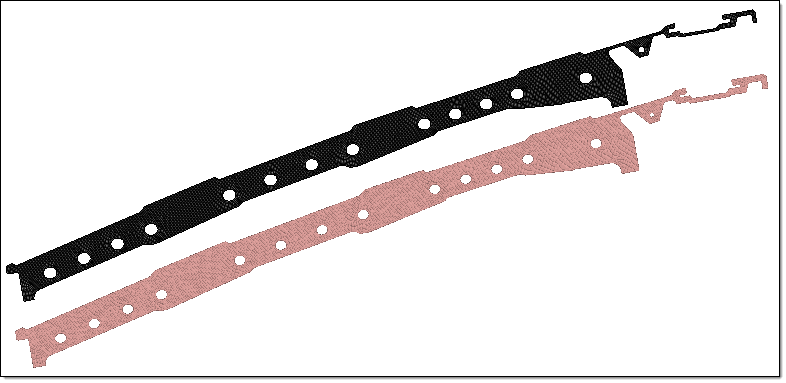
In the Field Realization dialog, click
Review to display the target model (green) and the
source model (pink).
Transform the source data:
In the Field Realization dialog, click the
Transform button.
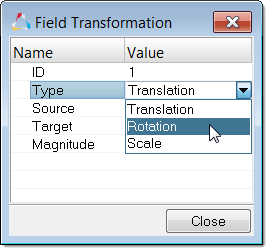
In the Field Transformation dialog, define
settings in the Type field to perform either a
Translation, Rotation, or Scale transformation of the source node.
Click the Close button to perform the
transformation operation.
Click Reset Review to display the updated
location of the new source model.
Repeat this operation until the source model and the target model are
in the same location.
Note: Manually define the vector direction by entering the
Source node x,y,z location,
Target node x,y,z location, and
Magnitude of the vector.