|
»Click here to display Table of Contents«
|

Creating Simple Parts |

|

|

|

|
|
Creating Simple Parts |
|
|
|

|
|
»Click here to display Table of Contents«
|
Creating Simple Parts |
|
|
|
|
|
Creating Simple Parts |
|
|
|
|
There are two types of simple parts that can be created: mass and RBODY. In addition, each type of part has more than one means of creating it.
Note that in the context of simple part creation, the term "part" does not necessarily refer to a meshed or geometric entity in the model; a "part" can exist in the tree without having any associated location, dimensions, or other characteristics. At creation, simple parts are usually only organizational in nature, but they can be modified to include entities that define location, dimensions, mass, materials, and so on. Think of such simple parts as empty containers at creation--the mesh that you later place into them defines the characteristics of the corresponding physical, real-world part that you need to model.
| 1. | From the Menu Bar, select Mesh Editing > Part > Simple. |
or
If the Mesh Editing panel is already open, select Part > Simple from the pull-down menu in the panel.
| 2. | Select the Mass radio button. |

Each tab represents a different creation method. Continue with the appropriate subsection below.
This method creates an exact duplicate of an existing mass, which you can then move or assign to another part/location in the model.
| 3. | In the From model tab, select an existing mass from the list. If there are none listed, you cannot create a new part by this method. |
| 4. | Click Save. The new part is created and can be viewed in the Tree, and manipulated with other tools within HyperCrash. |
| 3. | In the Create new tab, click |
or
Click ![]() and pick point on a shell element.
and pick point on a shell element.
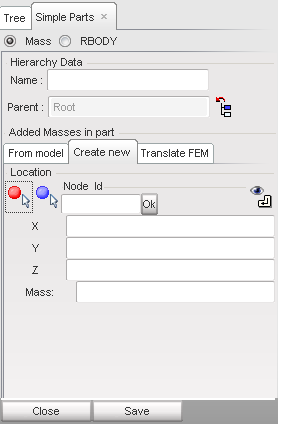
The Node ID, X, Y, and Z fields all populate with the picked node/point's data.
| 4. | Type in the desired Mass for the new mass/part. |
| 5. | Click Save. A new part and a new mass part are created, and can be viewed in the Tree and manipulated with other tools within HyperCrash. |
| 3. | In the Translate FEM tab, click |
or
Click ![]() to translate the part(s) selected in the tree.
to translate the part(s) selected in the tree.
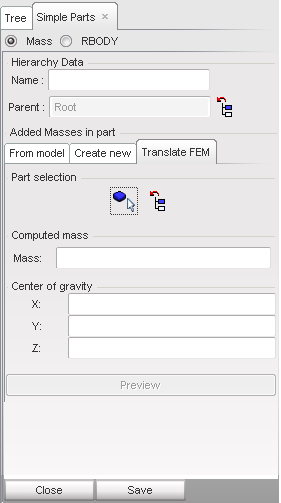
The Name field will populate with the picked part name. The fields for Computed Mass and Center of gravity populate automatically, but can be edited.
| 4. | Click SAVE. |
The chosen part(s) are deleted and replaced with new, empty parts and free nodes that carry the specified mass.
| 1. | From the Menu Bar, select Mesh Editing > Part > Simple. |
or
If the Mesh Editing panel is already open, select Part > Simple from the pull-down menu in the panel.
| 2. | Select the RBODY radio button. |
Continue with the appropriate procedure below, depending on the desired method of creation.
| 3. | Select the From model tab. |
| 4. | Pick the desired rigid nodal body or bodies from the list (use SHIFT-click and CTRL-click to select multiple bodies). |
| 5. | Click SAVE. The new part is created and can be viewed in the Tree, and manipulated with other tools within HyperCrash. |
| 3. | In the Translate FEM tab, click |
or
Click ![]() to translate the part(s) selected in the tree.
to translate the part(s) selected in the tree.
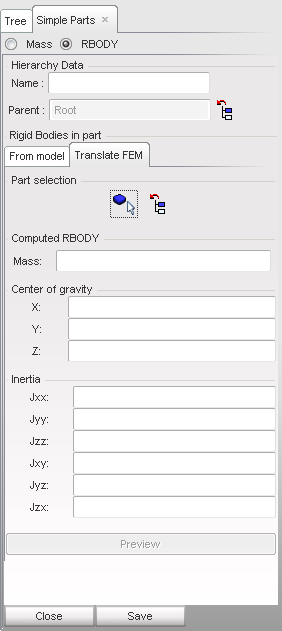
| 4. | The Name field will populate with the picked part name. The fields for Computed RBODY Mass, Center of gravity, and Inertia populate automatically, but can be edited. |
| 5. | Click SAVE. |
The chosen RBODY part(s) are deleted and replaced with new, empty parts and free nodes that carry the specified mass.